
It’s a well-known fact that a VPN will encrypt all your traffic through the VPN tunnel gateway. But if you want to secure only your browser traffic, or a bittorrent client and any software that’s capable of using SOCKS5, then SSH+SOCKS5 is what you’re looking for.
Another advantage of SSH+SOCKS5 tunneling is that you don’t need to install any software and it’s very easy to do it, with limited technical skills, and you can use any Linux server as a gateway, even a cheap VPS that will cost around $5/month.
Prerequisites
1. A Linux server running on a VPS. There are many VPS providers that you can chose from, like DigitalOcean. Check lowendbox.com for cheap VPS providers. Once you deploy your Linux server on the VPS (we recommend Debian or Ubuntu Server), you need to enable SSH access. Usually it is already enabled by default.
2. A SSH client that’s capable of setting up SOCKS tunneling: PuTTY.
3. Firefox. While you can use SOCKS5 in Chrome, we recommend Firefox because it is not using the system-wide proxy settings and it allows you to enforce DNS queries to be sent via the tunnel, not through your ISP.
Server setup
1. You may want to change the SSH port. By default it is using port 22. Edit /etc/ssh/sshd_config and change it. Restart openssh by running “/etc/init.d/ssh restart”
2. Add a user to the system, like mysshuser: “useradd mysshuser“. Setup user’s password and chose a strong one: “passwd mysshuser”
PuTTY Setup
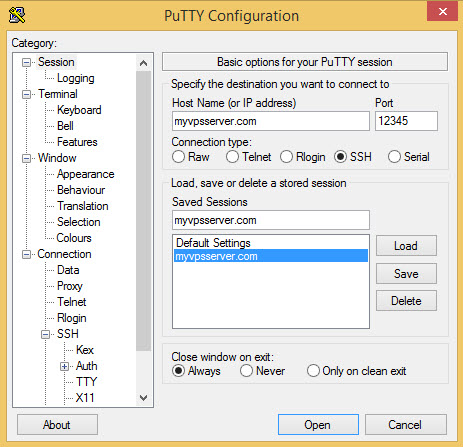
– enter your server IP/hostname and ssh port in the main screen
– enter a name for this session to save it for later use
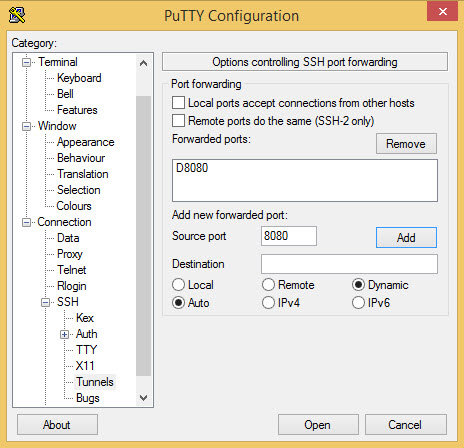
– in the left column, go to SSH > Tunnels
– add a local port for SOCKS5 in the “Source port” field, e.g. 8080, check “Dynamic”. It should look like this:
– Go back to Sessions tab and save the session
Now double click on the new session name and insert your SSH user/pass to login on server. Leave the session open.
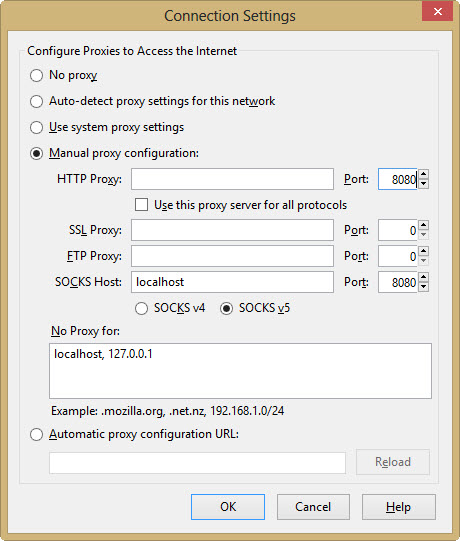
– Start Firefox, go to Tools > Options > Advanced > Network and click Settings… in the Connection field.
– Check “Manual proxy configuration” and insert “localhost” in the “SOCKS Host”, Port 8080
– in the address bar, insert “about:config” to open the advanced Firefox settings. Search for “socks” and change the variable “network.proxy.socks_remote_dns” to true.
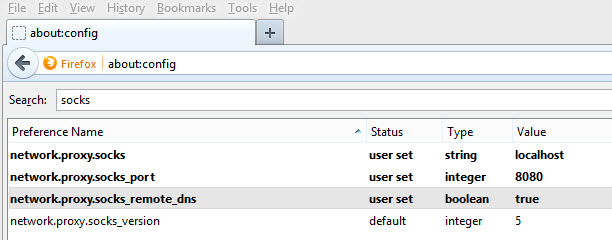
This is a very important step if you are serious about your privacy and want to avoid DNS leaks.
Websites can still get your real IP address using Flash plugins. Flashblock plugin for Firefox is a must.
This is all. Remember to open the SSH session in PuTTY every time you want to browse with Firefox using the SSH tunnel.
This is why I use Ironsocket.com as my VPN provider — they include Socks 5 proxy support, DNS proxy etc. along with OpenVPN, and allow 3 simultaneous connections as a basic standard
ssh cannot proxy udp traffic. socks5 does proxy udp traffic, but not if it’s getting there via ssh.
Could you update your article to reflect udp socks5 proxying.
did u figure the udp part out yet?